Self-Service Registration
About Colleague Self-Service
Registration at Ashland University is conducted online through Colleague Self-Service. In addition to searching and registering for classes, Self-Service gives you access to other academic-related details, such as GPA, progress toward your degree, catalog, anticipated completion date, and program notes. You will also find many other student-facing functions such as billing, payments, and graduation registration in Self-Service.
Registration in Colleague Self-Service
Log in and enter the Student Planning module
Go to selfservice.ashland.edu and enter your AU username and password. To get started with registration, click on Student Planning. 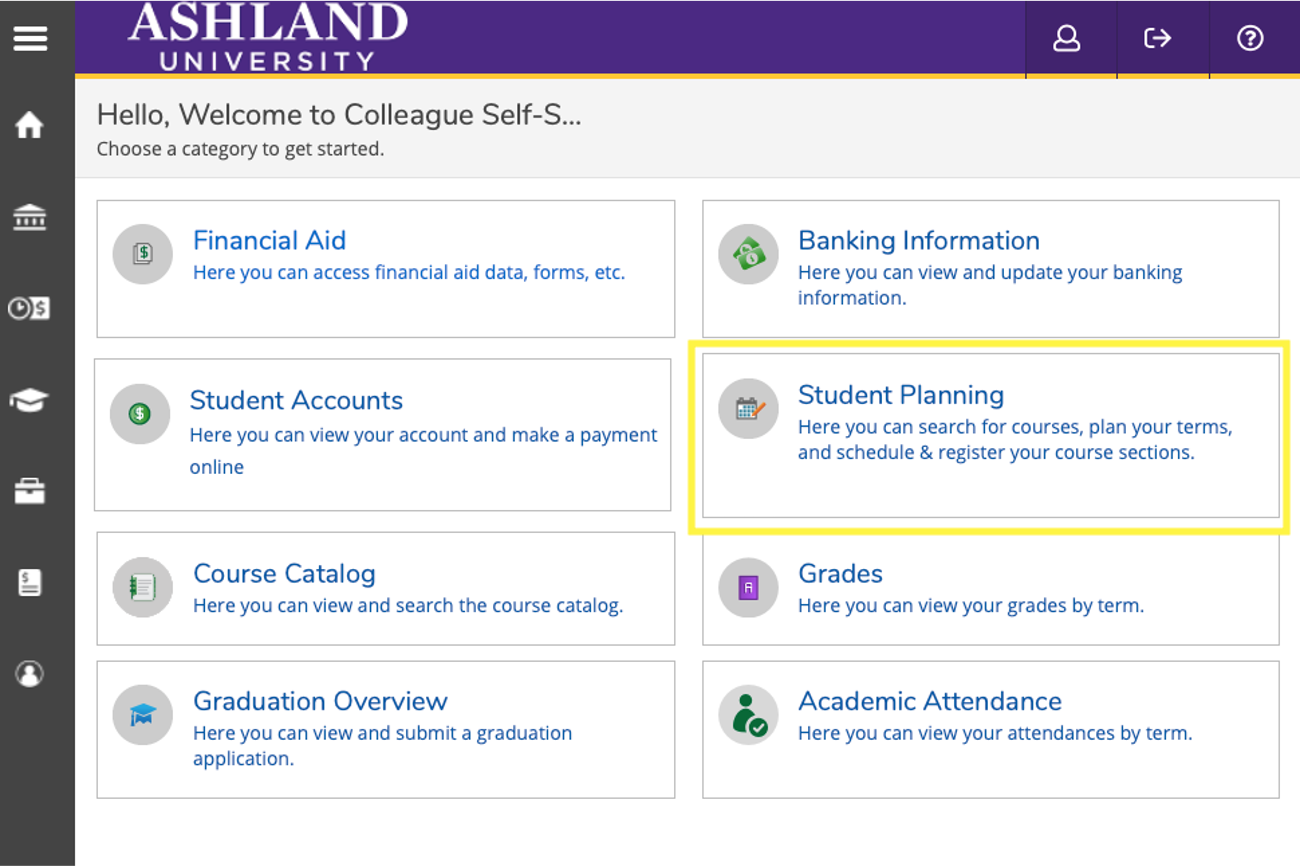
Accessing the Course Catalog
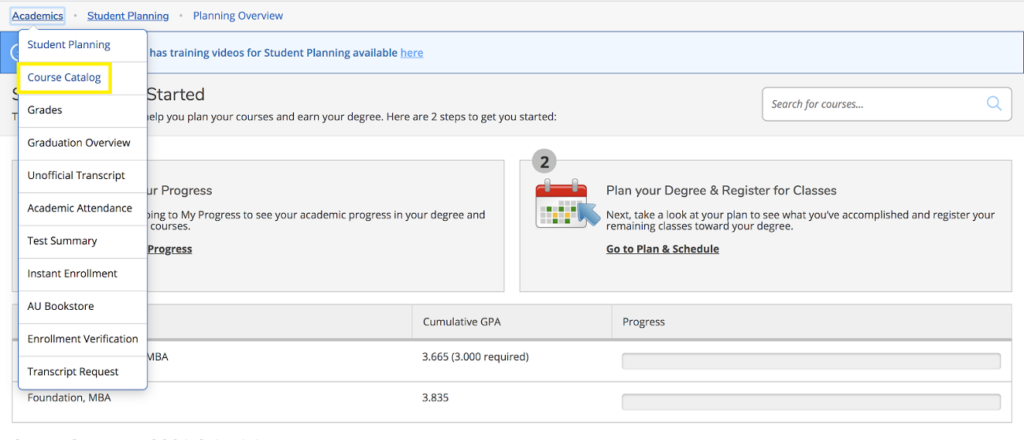
Registration begins by searching the course catalog. At the top-left of the screen, click on Academics and then select Course Catalog.
NOTE: You may see an option entitled Register for Classes. While it may seem intuitive to click this, DON’T. You must go to the Course Catalog and select your sections first.
Searching for Course Sections
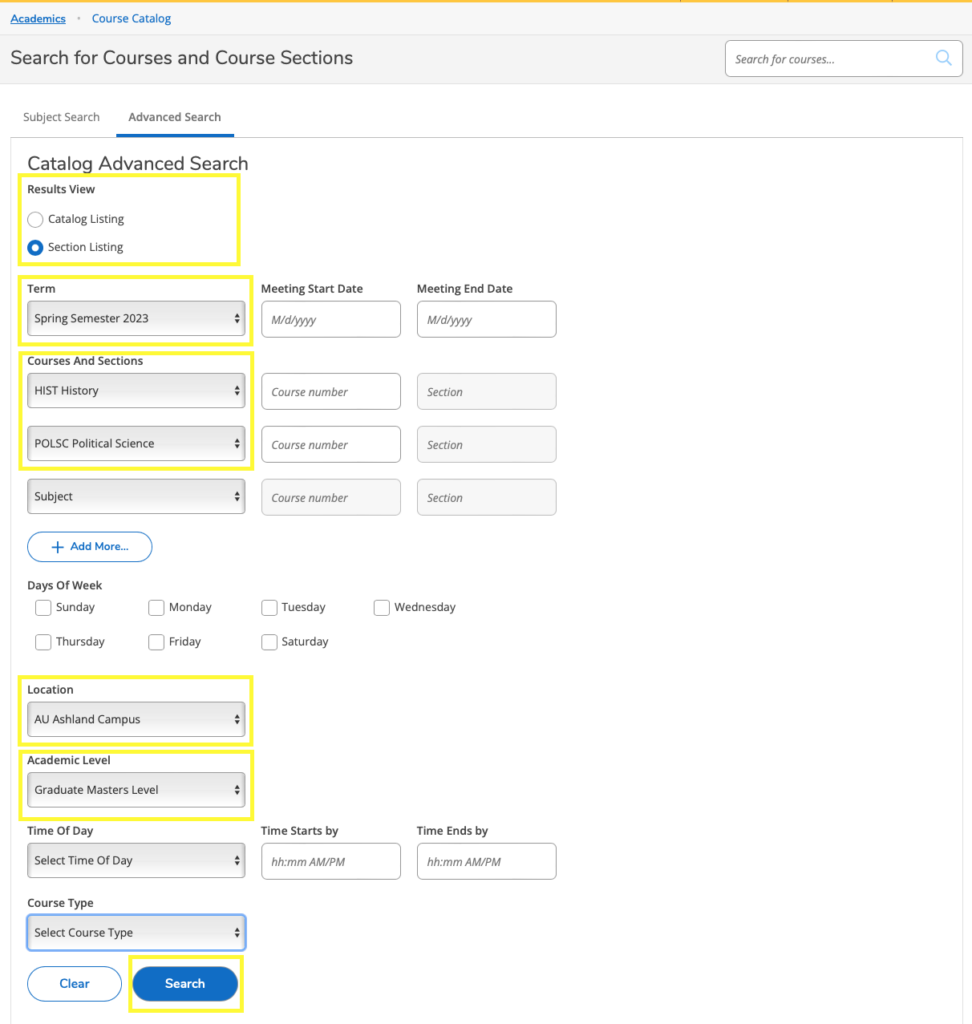
In the course catalog, click on Advanced Search. We suggest filling in the fields as follows:
Results View
Click the radio button next to Section Listing.
Term
Select the term for which you wish to register, e.g. Summer Semester 2023.
Meeting Start Date/Meeting End Date
In most cases, this should be left BLANK.
Courses and Sections
If you wish to restrict your search solely to sections with the HIST prefix, choose “HIST History” in the Subject dropdown menu.
If you wish to restrict your search solely to sections with the POLSC prefix, choose “POLSC Political Science” in the Subject dropdown menu.
If you wish to have all sections under both prefixes appear, select HIST in one box and POLSC in another.
For MASTAHG students searching for education courses, choose “EDCI Educ Curric & Instruct”, “EDFN Education Foundations”, or “EDIS Educ Intervent Specialist”.
Course Number and Section
You can narrow down your search only to a particular course or a particular section of a course. Please note that this search function is persnickety about how the search terms are entered. In most cases it is best to leave these fields BLANK.
Note that a Course Number is just the numeric portion of the full course number (e.g. the “501” part of “HIST 501 O1A”).
Note that a Section is just the section number portion of the full course number (e.g. the “O1A” part of “HIST 501 O1A”).
Days of Week
If you wish to restrict your search to only show courses offered on a particular day or days of a week, check the boxes for the days you wish to see.
NOTE: This is useful only during the fall and spring semesters. Summer courses always meet multiple days during the week. Leave these boxes blank when searching for summer semester courses.
Location
Choose a location from the drop down to restrict your search to only show courses offered in a particular location. For HIST/POLSC courses, there are only two valid options:
For on-campus summer courses, choose AU Ashland Campus.
For online courses during any semester, choose AU Online.
To find BOTH on-campus and online courses during the summer semester, leave this field BLANK.
Academic Level
Choose Graduate Masters Level.
Time of Day, Time Starts by, and Time Ends by
These fields are best left BLANK.
Course Type
Leave BLANK.
When ready, click Search.
Filtering and Choosing Sections from the Search Results
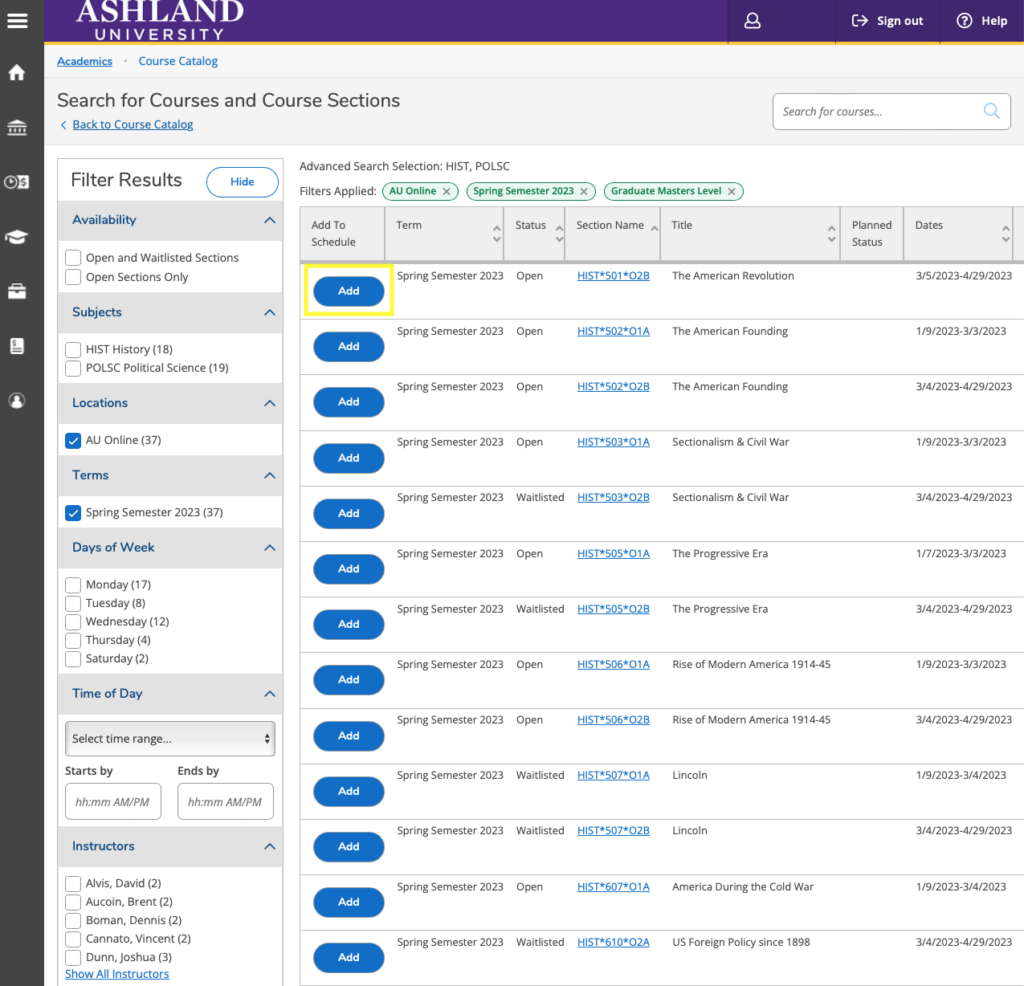
On the search results page, you can continue to filter results using the options on the left-hand side of the screen.
Review the list of course sections. Click Add to add the section to your schedule.
After clicking Add, a confirmation window will pop up. This screen shows the course section name, term, instructor(s), meeting information and dates, etc. This is also where you will indicate if you will take the course on a graded basis (i.e. for credit) or if you wish to audit the course (non-credit). Graded/For-Credit is the default option. Click the Add Section button at the bottom to add this course section to your schedule OR click Close to go back without adding it to your schedule. 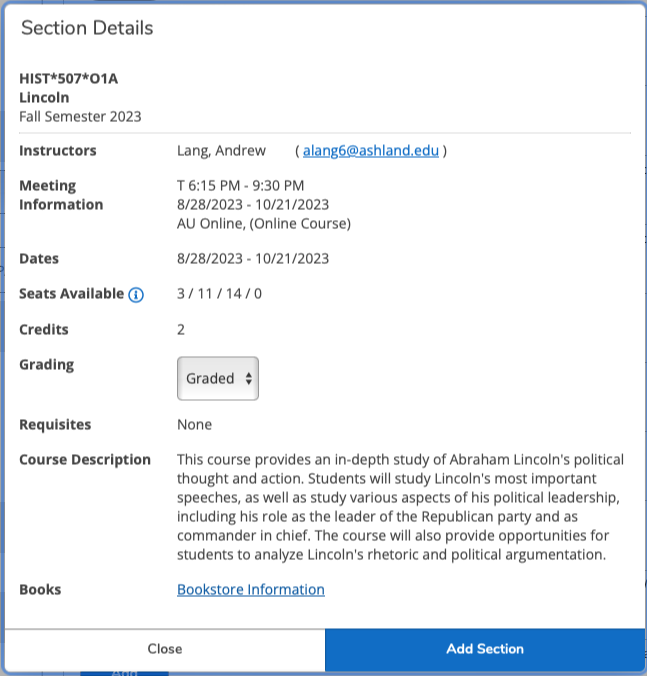
Repeat these steps until you have chosen all the course sections you wish to take for the semester.
After you add a course section to your planned schedule, you’ll notice a green informational message pops up at the upper right corner of the screen:

Notice that it says planned on the schedule. That’s important. It means you aren’t quite done yet! Keep reading.
Registering for the Course Sections You Have Selected
Once you have added all the sections you plan to take for the semester, do the following to formally register:
Click on Academics at the upper left of the screen and then select Register for Classes.
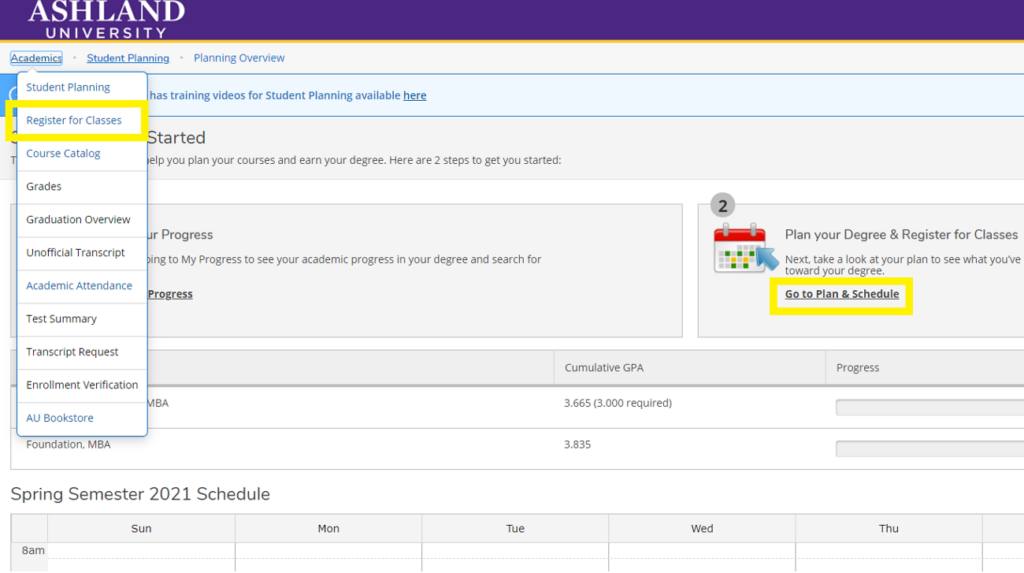
Here you will see the sections you just selected in a list on the left and planned out on the calendar on the right.
NOTE: Make sure you are looking at the correct semester. If you are attempting to register for Summer Semester 2023, be sure that “Summer Semester 2023” appears toward the upper left portion of the screen. If it says any other semester, use the “<” or “>” buttons on the screen to go forward or backward to Summer Semester 2023.
Click on Register Now in the top right corner to formally register for ALL sections you have chosen; or click Register underneath each chosen section to register for sections one by one.
Note the following:
– If you have planned sections that have a waitlist, there will be a yellow message in the meeting information. If a section is full and a waitlist is available, the Register button will be replaced with a Waitlist button.
– If you have planned sections with conflicting times, there will be a red message in the meeting information.
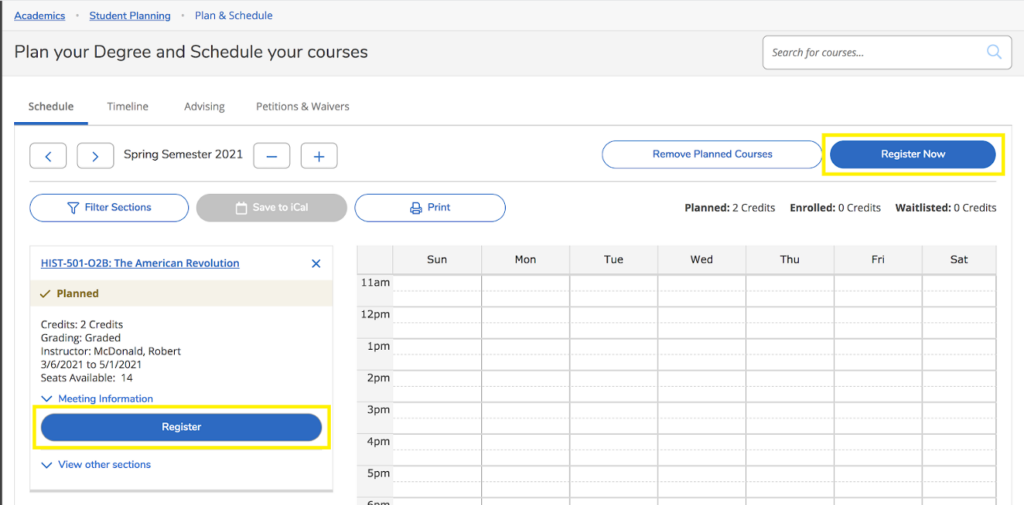
IMPORTANT – You MUST take this second step to formally register for each course section. If it still says “Planned”, you are NOT formally registered.
Confirming Your Registration
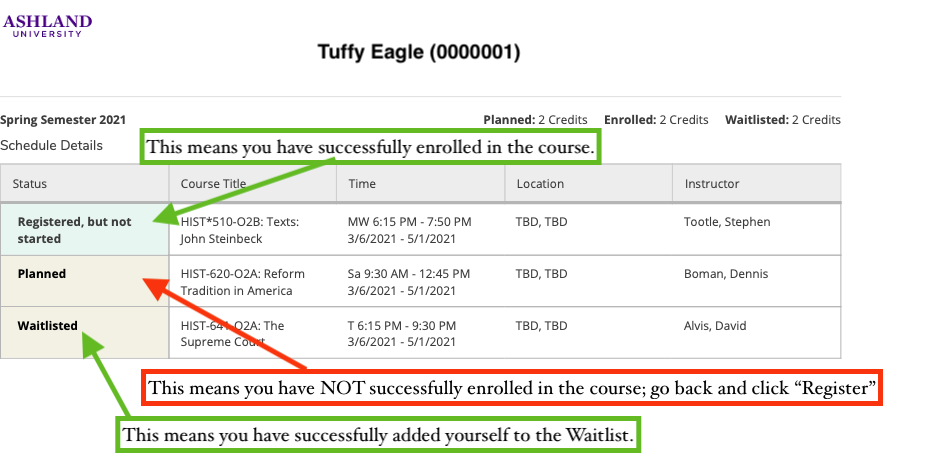
You can confirm your registration and schedule on this same screen. If your registration was successful, the Register button will change to Drop. Additionally, the calendar will now show the day and meeting times of your courses. You can also click the Print button to view or print a confirmation of your semester schedule.
The Print confirmation looks like this:
Getting Help
Please follow the directions above carefully, making sure to follow each step as written. At the end, be sure to click the Print button (see above) to view your semester schedule. This is the best way to confirm that you’ve properly registered for course section (as well as the best way to confirm if you’ve added yourself to a waitlist).
Need help? Feel free to reach out to us as [email protected].
Take the first step.
Learn more about MAHG and how you can be the expert teacher your students need. Admission is conducted on a rolling basis.
